Showing posts with label Grain Free. Show all posts

Tuesday, May 5, 2015

The most delicious and clean tacos ever! Sweet Potato with Greens and Plantain Tortillas, Paleo, Vegan and Awesome


Today is Cinco de Mayo (yay!) it is also the middle of a strict springtime vegan-paleo goal for me. So what to do. I looooove Mexican foods, it will be one of my favorite cuisines ever and always. My eyes were first opened to mind blowing vegan Mexican food at Gracias Madre in SF. I was lucky to eat there many times, but it was a taco plate when I first fell in love. There were piles of cooked leafy greens, spiced sweet potatoes, and all the crunchy toppings. I think there were beans and loads of their wonderful freshly made tortillas. This today is my homage to them.  The tortilla making is easy as pie, but if you love corn tortillas-by all means use those!

Paleo Plantain Tortillas 
with
Chili Sweet Potato, Leafy Greens, and Avocado

Tortillas:
Makes about 14 tortillas (taco "corn-tortilla" sized)

  • 4 green plantains
  • 1/4 cup hot water (or more)
Leafy Greens:
  • 1 bunch collards, swiss chard, or kale
  • 2 cloves garlic
  • 1/2 cup water
  • 1 teaspoon ground cumin
  • salt
Sweet Potatoes:
  • 4 sweet potatoes
  • 1-2 teaspoon chili powder
  • 1  teaspoon garlic powder
  • 1 teaspoon cumin
  • salt
Also
  • Avocado
  • Cabbage
  • Raddishes
  • Cilantro
  • Salsa


For these tortillas I want a savory or neutral sort of flavor so we use the unripe or green plantains. Peeling them can be a little bit of a chore, here is a link to my earlier instructions how to do this quickly. The plantains need to be peeled and sliced into chunks before boiling for 20 minutes. You will see the raw plantain is a very pale yellow color, once it has cooked in the boiling water there's a much deeper yellow color to the flesh. 

When the plantains are fork tender drain into a colander in the sink. Wait 5 minutes so they cool a bit. Place plantains in the bowl of a standing mixer, mix on low for about 5-8 minutes. If you have the plastic guard that keeps things from jumping out the sides of the bowl now is the time to use it. If not you can hold a tea towel around the top of the bowl until pieces stop trying to jump out. 

At first it may seem very dry and crumbly, but there is a nice point when everything comes dough like. Depending on your plantains and how ripe and cooked they are this may take more time than you expect just keep the mixer on. If everything is looking very dry, which happens due to moisture escaping through the steam, add a splash of hot water until you have a consistency like cookie dough. 

With our plantain massa ready we can move onto shaping and cooking the tortillas:


You will need a tortilla press or two rigid cutting boards. Parchment paper folded in half or a plastic bag cut into two pieces.Some coconut oil or other oil of your choice. A hot griddle or frypan. 
  1. Heat the griddle.
  2. Apply a tiny bit of coconut oil to the inside spots of the full department where you will flatten the dough. 
  3. Roll a ball of the dough in your hands.
  4. Place in between the two sheets of parchment or plastic
  5. Position this parchment sandwich in between your two cutting board or tortilla press. 
  6. Press straight down, with all your bodyweight. 
  7. Remove the top cutting board and check your tortilla. 
  8. Peel off the parchment carefully, this is easier than you imagine.
  9. Move the tortilla in hand directly to the griddle.
  10. Cook on each side for about 5 minutes. They will look dry, pale, with not much color. The edges will turn out just a bit. 
Repeat until the dough is all used up! 

Cut a bunch of collards or Swiss chard into thin ribbons. Cook on the stove with two cloves of minced garlic, salt, a teaspoon of cumin, and a 1/2 cup of water. Simmer and sauté until the water has about braided and your greens are tender and bright. 

Cube your sweet potatoes into roughly half inch pieces. Toss to coat with olive oil  and 1 to 2 teaspoons of chili powder, 1 teaspoon of cumin and 1 teaspoon of garlic powder. Spread on a sheet pan in one layer. Bake roast at 350° for about 30 minutes, until they're tender. There is no need to stir the sweet potatoes while they are roasting see you can just forget about them until the timer beeps!

Clearly, tacos should be assembled right as you are going to eat them. Place a small bed of greens as a base on the tortilla, followed by sweet potatoes, then topped off with thin slices of avocado, radish, cabbage and cilantro. salsa or hot sauce is always a good idea in my book.


 Enjoy!
***The tortillas will keep for a few days in the fridge kept sealed up in a bag. Very good just microwaved for 20 seconds to warm them up again. Or even better, throw on a hot dry pan till warm.

Wednesday, April 15, 2015

Chocolate Lovers Ganache Tart / Vegan and Paleo


This may be the most simple decadent chocolate dessert. Chocolate ganache in a chocolate nut crust, serve it with whipped coconut cream and berries (or whipped cream for you milk lovers). Bring it along to a pot luck, or if you are like me, cut thin slivers off the leftover piece in the fridge, eating them standing up in the kitchen. Somehow it all disappeared too quickly.
cocoa and coconut syrup for the crust.
I needed to whip up a dessert to bring to a girlfriends dinner party over the weekend. I was late, as usual I had overbooked my day, and had not left much time to bake. Rifling through my recipe box the ganache stared at me. It had been staring at me for a few weeks. I used to make it often, but it had been ages. It would be fast, simple, and with minimal baking time of about 10 minutes. Perfect! 
Flax seed hydrating in water.
I whipped it up, no problem, and threw it in the fridge to set. But, I needed to be getting on my way over to the party and it hadn't quite set yet...really not much at all...it was still jell-O jiggling. So I fitted a basked with ice packs and my chocolate tart and crossed my fingers that any chocolate flood would stay off the car carpet. Miraculously not a drop was spilled, we stuck it in her fridge when I arrived. By the time for dessert it was well set and ready to slice with a sharp knife. 
Serve small pieces, it is quite rich and depending on the chocolate you use, can be on the bitter side. Better to see who really loves chocolate and wants to come back for more. 


If you have even a moderately stocked kitchen, you can probably throw this together from things in your panty. Usually I make one large tart in a fluted pan with a removable bottom. A very elegant, shinny, solid chocolate presentation. This time I used a throw away aluminum pan because I misplaced my tart pan. And sometimes, I make small personal tarts, they are easy and adorable. The crust to ganache ratio is different, but with some berries would be quite balanced. 


Chocolate Lovers Ganache Tart / Vegan and Paleo

  • 1 Tablespoon ground flax seed
  • 3 Tablespoons water
  • 1/4 cup cocoa powder (sifted makes your life easier)
  • 1.5 Tablespoon coconut syrup (honey, or maple syrup)
  • 2 cups almond meal
  • 1/2 teaspoon salt
  • 1 can coconut milk (full fat)
  • 1 lb (16 ounces) bittersweet chocolate (Taza or other vegan chocolate)
  • 1 Tablespoon dark rum

Preheat oven to 350°. (makes a 9" or 10" tart pan, a 9" pie plate, or about 10 small tartlets)


Mix flax seed and water in a bowl. Let sit to hydrate for 5 minutes. 
Add cocoa powder and coconut syrup to the flax seed. Mix together with a rubber spatula. If you wisely sifted the cocoa powder this will go easily. If you are absent minded, like me, and didn't sift, you will now need to mush up many of the cocoa clumps. Sing something good, it goes by faster.
Add the almond meal and salt to the chocolate mixture. Mix everything together using the spatula. It will be dry and difficult at first, mix for about 1 minute and you will find it becomes more like a moist dough. 

Lightly grease your pan. Using your fingers, press the chocolate dough into a crust in your tart pan. Go up and sides and make sure there are no holes. If your hands get sticky, rinse them under cool water and return to crust making. 

Blind bake the crust for about 10 minutes in the 350° oven. Looking for it to puff slightly and smell a little toasted. There is nothing which needs to be cooked out, the flax will set and the almonds will be toasted. You can't mess it up, is what i'm saying. Just don't forget it and burn it. 
You can do this next step while the tart is baking. Open a can of full fat coconut milk, put in a saucepan and put on a medium low heat. Weigh out 1 pound of chocolate bits. If you have a chocolate bar, cut it into pieces. With a spatula, stir the coconut milk so it warms up but does not scorch. Heat it to just less than a simmer, just a few bubbles around the edge of the pan.
Turn off the heat. Pour in all the chocolate bits. Nudge them with your spatula to submerge them. But don't stir. (Double check the flame is turned off!) Give it a moment to melt all on its own.

About now you can remember to remove the tart crust from the oven to cool a bit.


Give the melting chocolate a stir or two. It will melt with no more heat, just stir with the spatula, it likes that. Once it is all velvety and smooth, you are home free. Stir the rum into the chocolate, stir to combine, and pour all the amazing melty chocolate into the chocolate crust. Dab the spatula on the top to flatten out the ripples. Place in the fridge to chill. This should happen in an hour or two, depending on how thick your tart pan is. 


Friday, March 6, 2015

Chermoula Chicken Boulettes AKA Paleo Chicken Balls on Sticks with Magic Sauce

Chermoula sauce is like fairy dust of the kitchen, it turns all it touches into magic food. Chermoula is a North African blend of warm spices, citrus and herbs in oil which is drizzled on everything from fish to meat and veggies. It can be used as a marinade, or a dressing. And I always wish I made a double batch, so I can drizzle its magical powers on everything. 

The chicken meatballs are so simple it is almost primitive cooking, two ingredients. Without the chermoula sauce they are almost unremarkable. Organic turkey or chicken is a good choice for all the reasons we know, environmental, health,  antibiotics, nutrition and animal rights. But also know that the flavors of the poultry are highlighted here, and it is a good time to choose the most happy organic chicken. 

This is a great dish if you are feeding friends who may or may not be gluten free, egg free or dairy free, or paleo! Obviously not a dish for vegetarians, but if you were doing a big party, I would stick some mushrooms or tofu on other skewers and let the vegetarians get some chermoula loving too.


Ground turkey is easy to find where I live, ground chicken less so. Both work. A butcher will often grind it for you, or in a pinch use a food processor to mince larger pieces of meat.

Anyway, now you have your ground or minced chicken. Mix it with the salt and form compact 1.5 inch balls of the chicken mixture. Thread them on metal or soaked wooden skewers. Place them to rest on a foil lined baking tray to rest while the chermoula sauce is made.

Place garlic, cilantro or parsley, lemon zest, paprika, chili powder, cumin, and olive oil into a blender. A blender really does a better job here than a food processor. If you live an electronics free life, do it old school with a mortar and pestle, adding oil in bit by bit as the herbs get bashed up. The sauce is not an emulsion, spices and herbs will settle out to the bottom giving it a chunky look. The flavors will blossom over time.

Drizzle just a bit of the chermoula on the uncooked meatballs. 

If your outdoor grill is covered in a snowy glacier, cook them under the broiler in your stove. With the broiler on high, line up the chicken skewers. Turning as they brown, keep a close eye on them. If your wooden skewers begin to char, cover them with some foil. 

The balls take about 10 to 12 minutes to cook through. Baste them occasionally with more sauce, or scoop up the pan drippings and use that. A thermometer at the interior should read 170° when the balls are throughly cooked.  

Remove to a plate and drizzle that chermoula sauce over them like crazy. 

Note: For individual appetizers, these can be cooked under a broiler in the same manner without the skewers. After the balls are cooked, plate up with some toothpicks. 

Chermoula Chicken Boulettes
16 medium meatballs, 4-5 servings

For the chermoula sauce:
4 cloves garlic
1/2 cup cilantro or parsley
zest of 1 lemon
2 teaspoons paprika
1 teaspoon chili powder
3/4 teaspoon ground cumin
1/2 cup olive oil
pinch of salt

For the chicken balls:
1 pound ground or minced chicken
1 teaspoon salt
4-5 skewers (soak if wooden)

Find this and 101 other meatball recipes in my new book Global Meatballs! I know, that is seriously a lot of meatballs. 


Saturday, February 28, 2015

Mushroom Quinoa Pilaf with Sundried Tomatoes and Pesto


I am still cooking out of the pantry and the freezer. I think this is the last bit of quinoa in my house. So far the pantry challenge is going fine. If you missed it, look at my cupboard and freezer here. 

When I make quinoa pilaf all the veggies tend to rise to the surface during cooking. This one was different than my usual, with the addition of pesto and sun-dried tomatoes. The concentrated tomatoes gave it a wildly deep complex flavor. It is full of summer sunshine. Try it in your own kitchen. Made with frozen vegetables it a matter of dumping it all together and setting it to cook. Even the mushrooms and pesto were from the freezer.

Obviously it is easy as pie. Switch up the veggies, add in carrots or kale, you really can't go wrong.

I have a bowl as a meal by itself. It would make a luscious side to grilled fish. 

Mushroom Quinoa Pilaf with Sun-dried Tomatoes and Pesto

2 cups quinoa
4 cups water
1/2 cup frozen or fresh leeks (sliced)
1/2 cup frozen green peas 
1/2 cup sun-dried tomatoes in oil
1/2 cup mushrooms cooked in olive oil (frozen or fresh)
1/4 cup basil pesto
generous pinch of salt

If using fresh mushrooms, slice and saute in olive oil with a pinch of salt. Slice the sun-dried tomatoes into bite sized pieces.  Put tomatoes and green peas, leeks, mushrooms and pesto into a pan with a tight fitting lid. 

This is a quick pilaf, the kind your whip up when you want to eat soon. The sun-dried tomato richness means we can skip a sauté step and still have complex flavors.

Add the water and quinoa to the same pot. Bring it to a boil. Give it a stir, cover, and cook for 20 minutes on low heat.

Enjoy!  

Sunday, January 25, 2015

Poached Salmon Balls with Cucumber Dill Yogurt Sauce

Salmon Balls are funny to think about. Lets get it clear, these are pureed salmon made into balls, not anything weird! These taste very much like the poached salmon you know, only more light and airy. They are almost without texture and melt in your mouth. Much like a French quenelle, if you have ever eaten those. 

Delicate pink dumplings of fish are held together only by egg and just a tad of potato starch. They take only moments to cook, literally two minutes in hot water.

Some might wonder, why bother making balls when plain salmon is so good itself? Novelty, great texture, interesting party food!

If you have family members who don't enjoy fish much, fish balls may be an easy way around that. Often texture or flavor is the offending characteristic. By pureeing it, both of those change. We all have heard that fish is an important food to include in our diets. Wild salmon especially has great nutrients and Omega 3's that make it a super healthy choice.

Most children should be eating more fish that they probably do, if they are not big fans of fish filets, try these poached fish balls. Changing the presentation makes fish accessible and fun, you can even eat them with your fingers!

It would be a very sophisticated choice for a party appetizer, served warm. I really enjoy them served just above fridge temperature as a luncheon dish. or stuck with toothpicks at pot luck. Once poached, they keep in the fridge for a day or two. So it would be possible to make the salmon balls one evening, stick a platter in the fridge and bring them to the afterwork party the next day, drizzled with sauce.


Warning:
The first time you make fish balls you may feel that you are committing a crime. When you put the nice fillet into the food processor, your heart may catch in your throat and you wonder if you should just pan-fry the thing. I know the feeling. But I urge you to take a deep yoga breath and just trust in trying something new. The paste may look terrible at first, just keep calm and fish-ball on


The cream sauce in my book is made with sour cream. But here I would like to share my yogurt sauce recipe, which is what I gravitate to. Plain yogurt, greek yogurt, goat yogurt, and sour cream are different but would be totally interchangeable here. Though plain yogurt will result in a thinner sauce. 


They are dead easy to make, fish and other ingredients go into the food processor. Get a big pot of salted water at a rolling boil. Then, very important, turn the heat on the water down, so it is no longer boiling. A very light simmer means the water is moving but not aggressively at all. (If the water boils, your fish balls will break apart.)

I use a mini scooper, it holds near to 2 teaspoons. If you don't have one use two small spoons to fashion ball-like portions. 

As each portion of fish-paste is scooped up, deposit it into the very-lightly-simmering poaching water. Continue, working in batches, each ball will fall in the water, puff up a bit, and then rise to the surface when it is near done. I find mine require about 2 minutes total in the water to cook. 


Remove them with a slotted spoon to a plate. Much of the excess water will steam off. Repeat with all remaining fish paste.

Mix up the dill sauce, chopped dill, peeled diced cucumber, yogurt, salt, pepper, a squeeze of lemon. 


Poached Salmon Balls
makes 25 fish balls

Cucumber sauce:
  • 1/2 cup peeled, diced cucumber
  • 1 cup Greek yogurt
  • 2-3 tablespoons chopped fresh dill
  • 1/2 teaspoon salt
  • fresh ground pepper to taste
  • squeeze of lemon as needed

Salmon balls:
  • 1 pound salmon, skin and bones removed
  • 1/2 cup whole milk (goat milk or non-dairy milk)
  • 1 egg
  • 1 teaspoon salt
  • 1/2 teaspoon fresh ground pepper
  • 1 tablespoon (12g) potato starch
To make the sauce, simply mix the peeled and diced cucumber with the yogurt, dill, salt, pepper and squeeze of lemon as liked. 


Cut the salmon into chunks small enough to fit into a food processor. Puree the fish until it becomes a fine paste. Add the milk and remaining ingredients. Puree about 10 seconds or as long as necessary to make the mixture very smooth. 

Bring a large pot of salted water to a boil on the stove. Turn the heat down to a bare simmer. With a spoon scoop up a small bite sized portion of the salmon paste. You can form egg shapes with two spoons, or use a mini scooper. As each is formed, drop it into the poaching water.

Each salmon ball will sink before floating. Allow to cook another minute or two on the surface (total about 2 minute cooking time depending on size of the balls.)

With a slotted spoon, remove the poached salmon to a warm plate. Cover with the dill sauce and serve warm or at room temperature. If you have leftovers, they are good chilled.

Tuesday, December 2, 2014

The Brussels Sprouts Recipe Everyone Wants

I have had many requests for this recipe, from people who ate the brussels sprouts, ones who heard about it, and some who read by thanksgiving post.  December is here, and we all return to work, but know that the holiday season has really started, and wish we could make cookies and play with ribbon all day long. Or more to the point, as a British friend said yesterday, December is all about alcoholic fruit and booze and cake. I think she included cake on the list, the Brits would need something to absorb all the boozy fruit. (Note: upcoming post, I will figure out what British boozy fruit is.)

December is here and brussels sprouts are among the few things still in season. These are incredibly savory and briny. A welcome change to the palate. The dressing is incredibly different than our usual heavy holiday season flavors or spice and sweetness.

It went around and around out holiday table, so that is worth something. People were like, "please pass the brussels sprouts" and "where did those amazing brussels sprouts go?" and "oh YES! There are still some left!" (Read thanksgiving Part1 and Part2.)

Simple enough to make up part of an every day dinner. Be sure to make extra because you will want the leftovers!

Notes on anchovies: many people are scared of the poor little fish. (Like my husband, who thinks he doesn't like them, but when I put them in food and does not tell him, he loves it!) They are super salty and little mashed fish is...whatever they are delicious. If you don't like them much, buy the European type in a tube, it is a paste and so easy to work with in the kitchen. Unscrew the top, squeeze into a dressing, screw back on the top, and back into the fridge for very easy storage. Don't skip them, they really make this dish sing.


Savory Brussels Sprouts with Capers and Walnuts

ROASTING:
3 lbs brussels sprouts, quartered
1/4 cup olive oil
salt
1 cup walnuts

DRESSING:
2 garlic cloves
2 shallots
1/2 cup olive oil
1/8 cup red wine vinegar
1/8 cup cider vinegar
1 Tablespoon grainy mustard
2 Tablespoons honey
3 Tablespoons capers (rinsed if in salt)
1/2 - 1 Tablespoon anchovy paste (or one 2 oz tin, drained and minced)
salt and pepper

Preheat the oven to 425°. Quarter each brussels sprout into 4 wedges. Place on 2 baking sheets, toss with olive oil and salt. Roast in the oven for 20 to 40 minutes. (Sprouts and ovens vary so.) Stir or shake once midway. The sprouts should have some charred black spots and crispy bits. The insides will be tender. Remove from the oven and transfer into a large bowl.

Toast the walnuts, spread them in an oven proof pan, roast in the oven for  about 8 minutes. The walnuts will be a warm brown and smell toasty and fragrant.

Make the dressing. If you have a food processor, fit it with the chopping blade. Peel garlic and shallots, chop into bits in the food processor. (Or mince with a knife.) The entire dressing can be made in the food processor, or a mason jar with a tight fitting lid works very well. Add the vinegars, olive oil, mustard, honey, capers, pepper, and some or all of the anchovy paste. Blend or shake the dressing well. Taste the dressing on a brussels sprout, add additional salt only if needed.

Pour the dressing over the still warm brussels sprouts (they absorb more flavor this way.) Serve warm or at room temperature.  Keeps for 4 days in the fridge.

*Adapted from Food and Wine, Brussels Sprouts with Walnuts, Capers and Anchovies (2011).

Monday, November 3, 2014

Warming Sweet Potato, Cabbage and Black Bean Vegan Casserole


Aren't sweet potatoes the most pleasing things? Comforting, soft, warm, bland but not tasteless. And they come in different colors, I got orange ones and white ones with purple skins for this recipe. They look stunning in alternating rows. This recipe takes just a bit of roasting, and is so pretty presented on the table. I made a southwestern inspired casserole here, some chipotle, some wine, some beans. All the good stuff. 


Savoy cabbage waits next to a bowl of sliced sweet potatoes tossed in olive oil, salt, pepper, sage and mexican oregano. This way they are nicely coated with oil to brown up in the roasting of the casserole process.


One head of savoy cabbage is sliced up into roughly 1/2" - 1" wide pieces. Rustic is ok! White wine, olive oil, and a sprinkling of chipotle powder are added into the pan for flavor. Lets begin the roasting, 350°.


Look, after 15 minutes or so in my convection oven the cabbage is won over. Wilted into silky strips, with charred tips which say lots of flavor.


The sweet smokey cabbage is placed in the bottom of my most beloved baking pan. (Anthropologie makes the craziest dish-ware, I love it!)
What is a casserole anyway? Instead of describing the food, its comes from the French word for the pan itself, used in both the oven and serving of the food. Casserole meaning both the very cool cookware one receives as awesome wedding gifts, and of the vegetables layered inside of it. Clearly casseroles have an image problem in popular culture, but I have no problem with them. I think anything baked together is probably better than baked alone!


Spoon a layer of black bean on top of the cabbage. Next time I make this casserole I will experiment in putting the beans at the bottom and cabbage on top of them. I feel it would make the beans more succulent. You could try it either way. So, about beans, I made mine using a dried heirloom variety, soaking and then cooking in my pressure cooker for 20 minutes. You can use black beans or pinto beans out of a can, that is easy. Remember to rinse them.


Sprinkle some chipotle on top of the beans if you are in the mood. Next comes the very fun part. Craft time with food! Arrange the slices of sweet potato in scolloped rows, alternating by color.


Bake entire cassarole in a 350° oven for 30 - 45 minutes. Crisped sweet potatoes and warmed through.

The potatoes retain their color difference after roasting, although I lack a really good photo because the evening lighting in my house is lacking and it didn't look pretty the next day. We had devoured it and it was a mangled mess of leftovers. We will make do with this one until I make this again!  Or you make it and send me the photo perhaps?

It was really impressive looking. Dinner party or pot luck worthy. Even Thanksgiving perhaps? We ate it along with salad and mustard on top. It served about 6  portions that way. Next time Ill take better measurements in the kitchen, but honestly it was really good, just wing-it, you can't go wrong.

Warming Sweet Potato, Cabbage and Black Bean Vegan Casserole


4-6 sweet potatoes
1 savoy cabbage
1 1/2 cups cooked pinto or black beans
1 teaspoon dry sage
1 teaspoon Mexican oregano
olive oil
salt pepper
1/3 cup white wine
1 teaspoons chipotle powder


Thursday, October 23, 2014

Indian Food Feast and Celebrating Diwali: Part 1


Happy Diwali to everyone, the Indian festival of lights. Celebrating the triumph of light over darkness, happiness and goodness over sadness and all the badness. The holiday serves as a moment to bring luck and prosperity to the year ahead. Diwali is celebrated all over India, making it unique among Indian holidays, which vary much from region to region. Everyone regardless of religion can happily celebrate these ideas, lightness winning out over darkness.

Candles are lit in every dark corner, illuminating both city and country in what is called the brightest of all festivals. There are fireworks and firecrackers, and lots of sweets to share. Diwali continues for the next few days, it officially begins today on October 23rd. So light all your candles and make a good wish against the darkness and the storms. 

I had a chance to celebrate Diwali, one evening early, with my culinary book-club. We had collectively read from two books by chef Vikram Vij, Vij's: Elegant and Inspired Indian Cuisine, and the more laid back  Vij's at Home: Relax, Honey.  A wide variety of recipes, with sweet stories about which ones his daughter loves, and which are favorites at the restaurant. Everything we cooked from the book was delicious, however we did find that some of the recipes could have been made more efficient for home cooks. It was agreed among all that although the recipes look long, once you get started it is very simple, as most of the ingredients are spices!

His food is clearly Northern Indian, with earthy spiced curries, and rice pilafs. Our pot-luck event netted Punjabi lentil curry, aka Daal Makhani, black lentils with kidney beans. Cauliflower rice pilaf. Potato and mushroom buttermilk curry. Brocolli rabe, tomato and mushroom yogurt curry. Chili spiced toor daal. Basmati rice and cucumber raita. Look at the variety of colors, we had full plates!

Considering the holiday, I wish I still had my copy of Great Indian Feasts, by Mridula Baljekar. She lays out favorite dishes for at least 6 holidays, Diwali being one. With fantastic stories of the dishes, how they are prepared, served and enjoyed. As well as what each one symbolizes or celebrates, a book full of riches. 

So what to make for Diwali?! Ill include the Daal Makhani recipe here, realizing with all my adaptations it is a nearly different recipe! And be on the lookout for Diwali Part 2, with a sweet recipe! As the sweets are really what Diwali is known for.


Daal Makhani, Black Lentils with Kidney Beans

11/2 cups whole urad lentils
1/2 teaspoon asafoetida (or garlic powder)
2 teaspoons salt
1 teaspoon turmeric
6 cups water
2 cans 14 oz kidney beans, drained and rinsed
1/3 cup melted ghee (or butter)
2 medium sized yellow onions
5 cloves garlic
1-2 tablespoon finely chopped ginger
1 teaspoon finely chopped chili pepper
1 teaspoon garam masala 


The lentils do not need to be soaked, however they cook in nearly twice as fast if they are soaked. Put lentils into an 4 quart pot. Add 6 cups of water, salt, turmeric, asafoetida (or garlic powder) and bring to a boil over high heat. 
Once boiling, reduce the heat to low and cover. Simmer for 30 minutes (or 15-20 if lentils were soaked.) The lentils will hold their shape, they are done when tender, they smush gently when pressed. 

While the lentils cook, make up the onion. They onion must be cut very small to hide in the daal, this is best done by grating the onion or using a food processor. Cut the onions into 4 wedges. Remove the skin and bottom. Place onion into food processor, blitz until it is all ground up, yes it will look soupy. Melt the ghee in a medium sized frying pan. Add the ground onion the the ghee. Cook on medium heat for 10 minutes, they onion will become translucent and fragrant. Chop the garlic, ginger and chili into equally small pieces, this can also be done in the food processor. Add the minced garlic, ginger, garam masala, and however much chili you want into the cooking onion. Stir, frying the onion for 5 minutes more. Some brown areas would be ok, mine remained pale.

Add the drained kidney beans to the lentils. Add the fried onion garlic mixture as well. Stir to include them, and simmer for 10 minutes so the flavors meld. The lentils hold up and can be simmered to keep it warm for an hour easily. 

Some people like to finish the daal with a good dose of cream. I personally dont, it is just beautiful as it is. 

Leftovers can be kept in the fridge for a week. Reheat and serve with everything. I even ate some for breakfast today!

Wednesday, October 8, 2014

Baked Pesto and Egg Tomatoes: Stuffing Part 3

A few things about tomatoes; The longest tomato plant ever measured was 65 feet and USDA says they are 25,000 varieties of tomato. Other sources claim only 10,000. Still a lot of varieties.

One of these varieties is a stuffing tomato! They resemble a cross between a tomato and a bell pepper, with thick walls, empty space inside and very little juice.


They are the sort of thing you may find at a farmers market, or more likely a friends garden. My uncle grew these beauties with red and yellow stripes.


They are light for their size and all the seeds hang clustered in the middle.


The innards are easily scooped out using your fingers. The seeds and ribs can be gathered in a bowl and thrown into a stew or whatever you are making next.

Some people like to stuff tomatoes with tuna salad or rice. This is part of my series trying out healthy takes on stuffed veggies, see my stuffed poblano peppers and paleo vegan stuffed mushrooms.


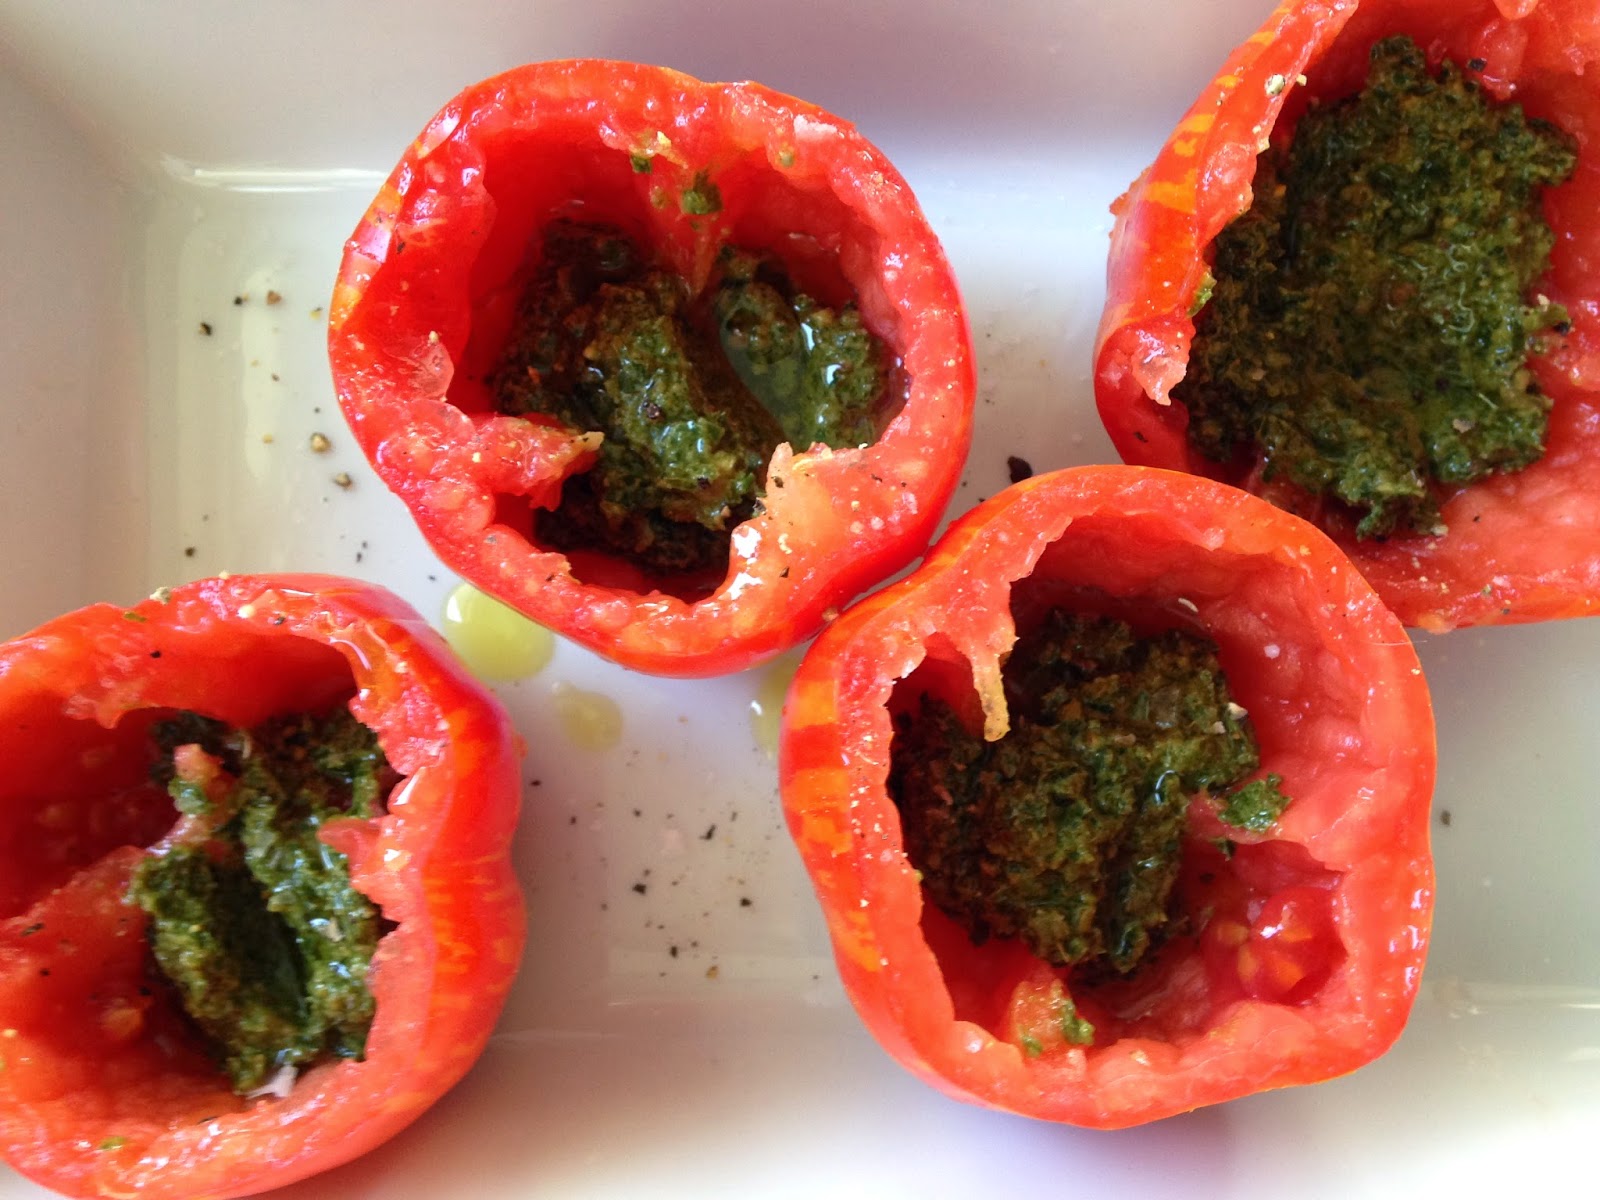
What I like best with tomatoes is PESTO! Set the tomato cups upright in a baking dish, scoop in a spoon of pesto into each, drizzle a tad bit of olive oil (I'm not sure if this is necessary but it felt right at the time) a sprinkle of salt and fresh ground pepper.


The other thing I love most with tomatoes is eggs. Well, to be honest I also love mayonnaise. That will have to be another day. Today I loved eggs the most. The way Brits serve warm tomatoes cooked on the griddle alongside morning eggs and toast. Sunny diced tomato folded into scrambled eggs, or a pan of shakshuka. Sign me up.

Easy as pie, tip a cracked egg into each tomato cup. Hopefully your tomatoes, like mine, would be the perfect size for an egg.

Sprinkle with salt and pepper for good measure. Bake in a preheated oven at 375° for 20-25 minutes. Keep an eye on them towards the end, the whites should be set and the yolks still have a softness.

This is tricky to achieve, if you figure it out send me a message. My baked eggs always turn out with a nearly solid but still creamy yolk. I wish they were more runny, but I strongly hate loose uncooked whites on my plate. I have big goals for my life, figuring out baked eggs is one of them.

Serve alongside a salad for an inventive brunch dish. Every bit is delicious, When cut into the tomato bowl gives way, the egg slides apart, and the hot basil pesto covers everything. Decadent and special and yet healthy and feel good food.


Baked Pesto and Egg Tomatoes

serves 2

4 stuffing tomatoes
4 fresh farm eggs (on the small side)
4 tablespoons of basil pesto
drizzle of olive oil
salt and fresh pepper
good balsamic vinegar and salad for serving

Cut off just the tops of the tomatoes and remove the innards to prepare for stuffing. Place in a baking dish. Put one tablespoon of pesto in each tomato. sprinkle with salt, pepper and olive oil if desired. crack one egg into each tomato. Bake in a 375° oven for 20-25 minutes until the eggs are cooked to the desired level of done-ness. 
Serve alongside a salad drizzled with balsamic vinegar.

Friday, August 15, 2014

Crispy Chickpeas for Salad and Snacking


Chickpeas, or garbanzo beans, Garbanzo is a great word to say out loud, gar-ban-zo! Just last week I was in the grocery store, in the canned beans area, picking up some black beans and a guy was staring at the wall of beans and looked so overwhelmed. He caught my eye and asked "can I ask you a question?" I love being asked question in the supermarket because i am full of knowledge in this area. Like the elderly lady who likes to hang around the yarn store to tell people the best way to put fringe on their afghans, (this happens). So back to beans, this guy was so confused if the can marked Garbanzo Beans was the same thing as chickpeas. I assured him they were one and the same, and go by both names. I guess he was British, from his accent. And in the UK the little things are always called chickpeas, and in other areas (Spain, for one, they are garbanzos) We in the USA cannot decide.


Which brings me to think about canned beans, I used to buy many more canned beans, and chickpeas were always canned. I thought they never got soft if you made them from dry ones. Sometime in the last few years this changed, I began making a pot of beans every week or two, and I tried chickpeas a few times, now I alternate beans one week, chickpeas the next. I make hummus and these yummy spiced crispy fried chickpeas. I still make sure to have a few cans of beans in the cabinet for "emergency" food if we need huevos rancheros one morning.  

You can make the spicy crispy chickpeas with either type, you may be like me and think that dried beans and chickpeas in particular take too long to cook and are too much trouble. I will just remind you that dried beans cost pennies compared to canned ones and the trick is to properly soak them. Proper soaking is especially important with chicky-chicky garbanzos. 

I put them in water at night before bed, if i am going to cook them the next evening. I soak most of my beans for 6 hours, but chickpeas (it sounds extreme) I like to soak 12 to 24 hours on the counter. But this is so easy: a bowl, dry beans, water to cover by at least twice the volume. In this time, they plump up and release all these foamy gassy bubbles (see the picture!) After 24 hours they have an almost transparent quality and rattle around like marbles. I like to stir them around with my fingers. 

Before cooking, always pour out the soaking water (the water turns all yellow!), and give them a good rinse until the water is clear. Then it is a matter of boiling them till done. Cover with plenty of water two or 3 times the volume, no need to measure. Bring to a boil and keep at an active simmer for an hour, or until they are tender. When you press one between your fingers it should have some resistance and then smush. More al dente than smushy hummus. 

A few thoughts. If you have hard water, your beans will never really get soft because of the minerals, you might like to use filtered water. If you have a pressure cooker, this is the perfect time to use it! I use my pressure cooker always, I find if I time 15 minutes after the pressure comes up. Then turn it off and let the pressure come down by itself, they are perfect. 

Strain the little beauties through a colander. In order to get the crispy ones crispy, it is helpful to dry them for a bit. So pour them onto a tea towel in a layer and do something else for a half hour.  (The same goes for canned chickpeas, rinse well, lay to dry) 

Good, now the chickpeas go into a bowl with salt and the middle eastern spices; cardamom, cumin and allspice. Tossed around it all sticks to them, beautiful. 


Heat a heavy skillet with enough olive oil to coat the bottom like a puddle. When it is hot and shimmery, add the spiced garbanzos. Shake them about and leave them to fry for 3 minutes or so, come back in and stir them around, repeat. they cook in 10 minutes or so. I like when they start to split open, the frying bubbles will subside and there will be less oil in the pan, this is how you know they are done. Remove with a spoon to drain in paper towels for a moment.


Crispy crunchy chicky chicky! Don't burn yourself, wait a moment. When shaken around they sound terrific. These are an awesome snack by themselves.

They are so awesome they make any salad more awesome. Today I made a salad of fresh green lettuces, kale, cucumbers, and red spring onion. A squeeze of fresh lime and plenty of olive oil made a fine dressing. Then I had a hankering for some creamy tahini dressing on the chickpeas, so I mixed that up really quickly. It did make it that much more delicious. It was a nice dinner, I am eagerly catching up on Game of Thrones, as fast as Netflix can send them. Yes, I often eat on the couch in front of the TV. Quelle horreur! 

Note: Leftovers are so so, they looks the crispy pop. To refresh them, cook in a hot pan for a few minutes until dry and crisp again. 

Crispy Chickpeas 
1 1/2 cups Cooked Chickpeas (1/2 cup when dry)
1/2 teaspoon salt
1 1/2 tsp ground allspice
1 tsp ground cardamom
1 tsp ground cumin
about a 1/4 cup olive oil 

Cook, drain and dry the chickpeas. Toss in a bowl with the salt and spices. Heat a heavy frying pan with olive oil to create a puddle on the bottom. Toss in the chickpeas when the oil is hot (do in 2 batches if your pan is small.) Shake periodically, after about 10 minutes when the bubbles in the oil have subsided and there is less oil in the pan, and the chickpeas begin to split: remove them from the pan to drain on paper towels. 
Add on top of salads or eat with a meze platter of olives and other yummies.