Showing posts with label Italian. Show all posts

Saturday, January 31, 2015

Italian Meatball Subs Sandwiches for Superbowl Sunday!

There are three kinds of people who get excited about Superbowl Sunday. Firstly, the football fans, those who watch every game and get excited by reading stats all season are in the same camp this weekend with the fairweather-playoff-only-fans. Secondly, there are those people who save all their attention for the commercials, with the football footage as a moment to go to the bathroom or read twitter. Thirdly, there are those of us who are happy hunkering down in the kitchen, excited to have a reason to make guacamole, nachos, meatballs and and whatever else. 

Can you tell I am a happy member of the snack-food-making group? I support my Pats and am pro-football watching for everybody else. I just can not keep my attention on that game for more than 2 minutes. My mind wanders and then I am like "...what is happening? Don't I have something else to do?" That is the story of me and football. I will make sure to visit the living room during half time to catch Katy Perry.
So what are we making for the SUPERBOWL? 
MEATBALL SUBS! They epitomize football for me, messy, greasy, cheesy, total guy food, with bold flavors. They are a favorite of my husband, and both the subs and the meatballs themselves are totally easy to put together. This is my recipe from Global Meatballs, my brand new cookbook! 

Firstly, we need ground beef, onion, eggs, milk, bread crumbs, oregano, chili flakes (or powder because I cant find the flakes), parsley, garlic powder (you don't even need to use fresh garlic!) It's dead easy. Remember to get some sort of sub roll, all I could find at TJ's was the baguette, which is a good substitute ;)  And cheese, don't forget the provolone.


Friends, I recommend always making you stuff from scratch, like tomato sauce. And 95% of the time I do. Making marinara sauce isn't hard, especially with canned tomatoes. But sometimes we all have busy days. For those days, keep a jar of a good quality organic marinara sauce in you cupboard. An organic one without preservatives or added junk. Put that in a pan to warm on the stove, if you are using jarred sauce a squeeze of lemon juice and a pinch of sugar can do wonders to freshen it up. And chili flakes if you roll that way. 

Mince up a yellow onion, saute it in olive oil until softened. Mix bread crumbs, milk, salt, spices and herbs. Add the eggs, ground meat, parsley. Preheat the oven to 400°.
Mix by hand, incorporating all the ingredients together. If things feel dry, add a splash more milk, this is what makes them tender. I like to let the mixture fall through your fingers, sort of sorting it over and over, rather than kneading and massaging it. This will keep the breadcrumbs light and fluffy, helping the meatball to stay tender. 
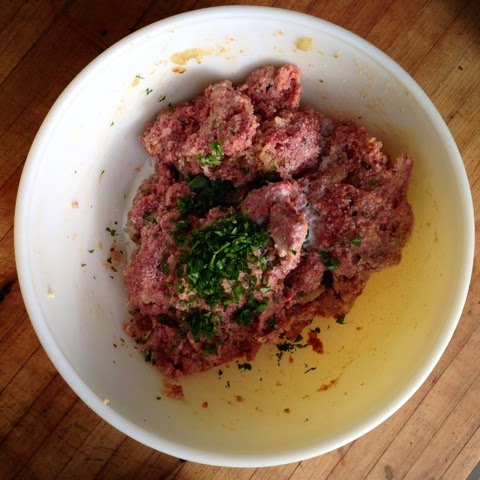


When you are pleased with the mixture, rinse your hands. Get out two sheet pans to bake the meatballs on. To roll nice smooth balls, moisten your hands under cool water occasionally. I find it makes the process go much faster. I make my meatballs golf ball size. I know some people like really big meatballs in their subs, so ok, just cook them longer. 

Bake in the oven for 15 minutes. When done they will be sizzling, cooked though, and crispy on the bottom. Don't fuss over crisping all sides, they all get smothered in sauce. 


Use a thin spatula to remove them from the sheet pans. Deposit them into the red sauce. turning to coat. Set aside. 

Get out the bread and cheese.
slice that bread crosswise, sandwich ends connected. (Hard baguette problems? Pssst...put in it in microwave, makes it all soft.) And LAYER up that cheese. 

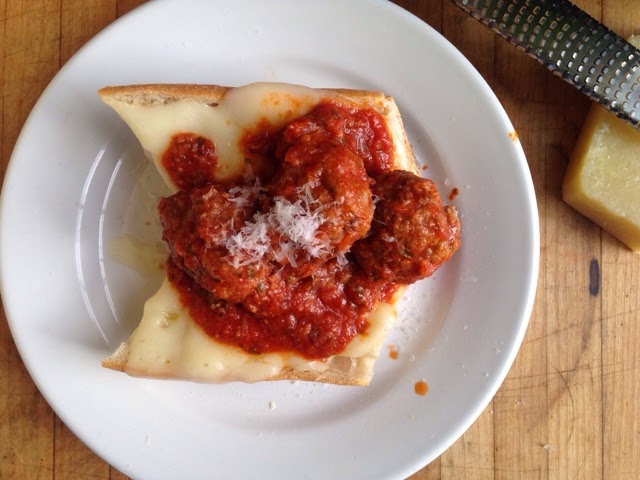
Is your oven still hot? No, ok, turn on your broiler for a moment while we melt this. Looking good! And a little line of meatballs, with extra sauce.

Some grated parmesan cheese makes it a pretty picture. 
Enjoy the game, in whatever way you like it. Ill be there making meatball sub sandwiches talking over all the important parts. Here is a good story you can distract people with. Did you know that meatball subs are a totally American food? Subs, hoagies, grinders, or whatever you call them where you are from have only been around for like 100 years or less. I have read they were developed sometime between the year 1900 and 1940. The exact New England city is not known, somewhere between Maine and Pennsylvania lies the home of the sub sandwich. What better thing to eat while our New England Patriots go and crush Seattle! (No offense Seattle, you have cool people in your city.) Cheers to a fun weekend! 


Meatball Sub Sandwiches

for the meatballs:

  • 2 pound ground beef
  • 1/2 pound ground pork
  • 2 teaspoons salt
  • 2 eggs
  • 1 yellow onion
  • 1 cup bread crumbs
  • 2/3 cup milk
  • 1 teaspoon garlic powder
  • 4 tablespoons chopped parsley
  • 2 teaspons dried oregano
  • pinch of red pepper flakes


For sandwich making:

  • Sub rolls or french bread
  • marinara sauce
  • provolone cheese
  • (mozzarella and parmesan cheese optional)


Wednesday, October 8, 2014

Baked Pesto and Egg Tomatoes: Stuffing Part 3

A few things about tomatoes; The longest tomato plant ever measured was 65 feet and USDA says they are 25,000 varieties of tomato. Other sources claim only 10,000. Still a lot of varieties.

One of these varieties is a stuffing tomato! They resemble a cross between a tomato and a bell pepper, with thick walls, empty space inside and very little juice.


They are the sort of thing you may find at a farmers market, or more likely a friends garden. My uncle grew these beauties with red and yellow stripes.


They are light for their size and all the seeds hang clustered in the middle.


The innards are easily scooped out using your fingers. The seeds and ribs can be gathered in a bowl and thrown into a stew or whatever you are making next.

Some people like to stuff tomatoes with tuna salad or rice. This is part of my series trying out healthy takes on stuffed veggies, see my stuffed poblano peppers and paleo vegan stuffed mushrooms.


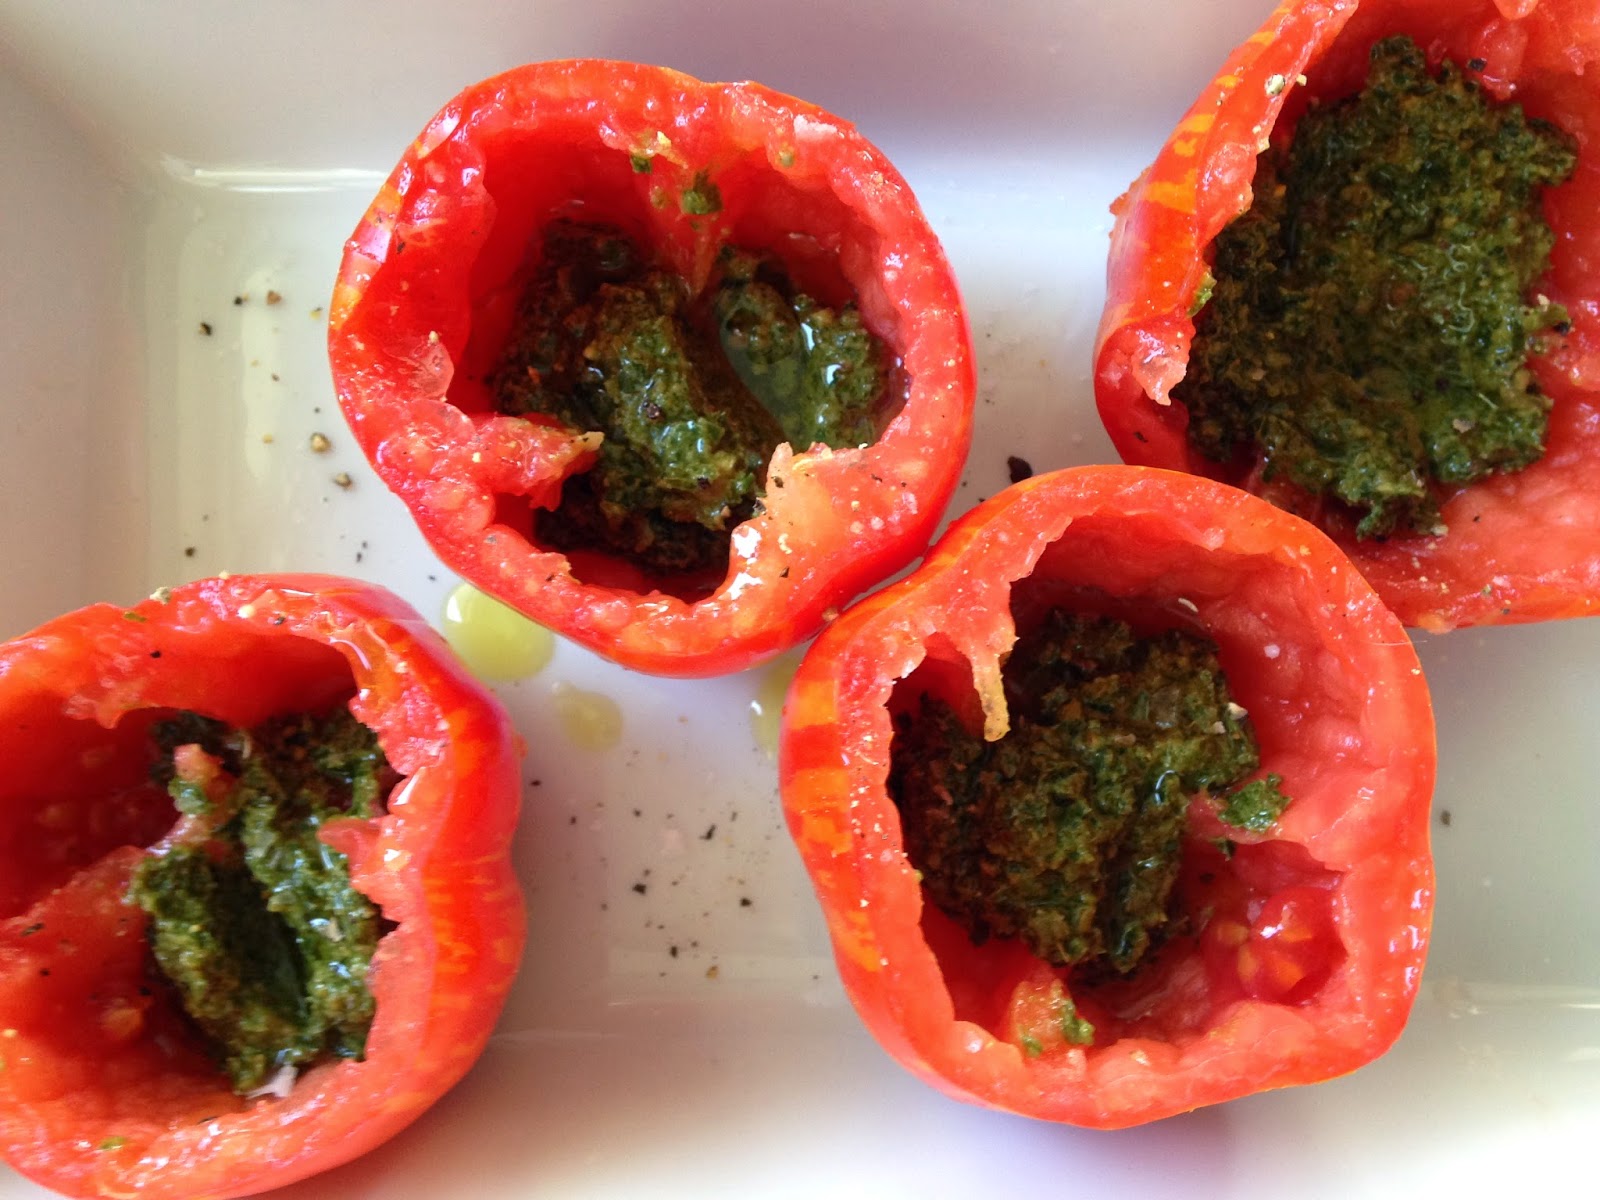
What I like best with tomatoes is PESTO! Set the tomato cups upright in a baking dish, scoop in a spoon of pesto into each, drizzle a tad bit of olive oil (I'm not sure if this is necessary but it felt right at the time) a sprinkle of salt and fresh ground pepper.


The other thing I love most with tomatoes is eggs. Well, to be honest I also love mayonnaise. That will have to be another day. Today I loved eggs the most. The way Brits serve warm tomatoes cooked on the griddle alongside morning eggs and toast. Sunny diced tomato folded into scrambled eggs, or a pan of shakshuka. Sign me up.

Easy as pie, tip a cracked egg into each tomato cup. Hopefully your tomatoes, like mine, would be the perfect size for an egg.

Sprinkle with salt and pepper for good measure. Bake in a preheated oven at 375° for 20-25 minutes. Keep an eye on them towards the end, the whites should be set and the yolks still have a softness.

This is tricky to achieve, if you figure it out send me a message. My baked eggs always turn out with a nearly solid but still creamy yolk. I wish they were more runny, but I strongly hate loose uncooked whites on my plate. I have big goals for my life, figuring out baked eggs is one of them.

Serve alongside a salad for an inventive brunch dish. Every bit is delicious, When cut into the tomato bowl gives way, the egg slides apart, and the hot basil pesto covers everything. Decadent and special and yet healthy and feel good food.


Baked Pesto and Egg Tomatoes

serves 2

4 stuffing tomatoes
4 fresh farm eggs (on the small side)
4 tablespoons of basil pesto
drizzle of olive oil
salt and fresh pepper
good balsamic vinegar and salad for serving

Cut off just the tops of the tomatoes and remove the innards to prepare for stuffing. Place in a baking dish. Put one tablespoon of pesto in each tomato. sprinkle with salt, pepper and olive oil if desired. crack one egg into each tomato. Bake in a 375° oven for 20-25 minutes until the eggs are cooked to the desired level of done-ness. 
Serve alongside a salad drizzled with balsamic vinegar.

Monday, September 1, 2014

Modern Stuffed Mushrooms, Paleo Vegan and Heathy

This version of stuffed mushrooms may reframe them in your mind as a still relevant modern foodstuff. Begone ubiquitous cheese and breadcrumb appetizer. You will find neither here.

I love mushrooms, they naturally test as close to meat as any vegetable ever gets. Full of earthy umami taste and juice which makes us salivate for more.


I think the tradition of stuffing one food with another is very silly. I just don't get it. Stuffed peppers, squash, mushrooms. In Ottolenghi's Jerusalem there is a whole chapter titled "stuffed" about stuffed turnips, carrots, and other traditional delicacies. It have never understood why the stuffing and the stuffie are better off this way than if they were all in a pot together.  Can somebody explain?


Which brings me back to stuffed mushrooms, which I made on a whim, out of character, since I don't do stuffed things. They are fun because they stay juicy and come out in a round meatball-like shape. And everybody loves food in balls, this is a fact. Maybe this love is related to stuffed veggies?

These guys are not fussy, it would be easy to mess around with the recipe if you don't like parsley or some part, just replace it. I threw a little bit of cheese into a few of them to see if it made a big difference. It didnt. Cheese is yummy, so if you of your guests are in the mood for cheese, some grated parmesan or the like would be a good addition. But these guys are about the flavor of the mushroom, onion and sage. The wine adds complexity.


Modern Stuffed Mushrooms

20 ounces whole baby bella mushrooms (2 long grocery store containers)
1/3 cup chopped fresh parsley
1/3 cup small diced red onion
4 garlic cloves, minced
1 tablespoon dried sage. (more if using fresh)
1 teaspoon dried thyme
4 tablespoons olive oil
1/3 cup dry white wine 
1 teaspoon salt
fresh ground black pepper


With your fingers, pop the stems off of the mushroom caps. Reserve the stems in a pile. Place the caps upside-down on a baking pan. (I lined mine with parchment paper hoping for easy cleanup, it helped a little bit, but not much actually.) 
Discard any yucky or old bits of the stems. Mince the mushroom stems finely. Put them in a bowl. Chop parsley, and red onion into pieces that are as small as the mushroom pieces. Mince garlic, add garlic, thyme and sage to the mixture. Sage works magic with mushrooms.
Add the salt, pepper, olive oil and white wine. Mix it all together well, look at how colorful! Follow your instincts, if you want more olive oil, do it! More sage, do it! The wine adds moisture and flavor, the mixture should feel moist but not wet, there should not be a puddle of liquid in the bowl. If there is, just distribute it into the mushroom caps at the end. 
Fill the mushroom caps with stuffing. This is accomplished best, messily, with a spoon and hands. There should be enough for all the mushroom caps. Try to get the stuffing to stay inside and on top to make a round mushroom! 
Bake in a preheated oven at 350° for about an hour, until they are done. Dark brown, tender, juicy, crispy bits on top. They will look like this:
Serve hot for best wow-factor. They store for a week in the fridge. And they reheat super well! (Even as I did over an open fire on a recent camping trip.)


Monday, June 16, 2014

Ultimate Pizza Quest

900° The best pizza made at home
I have discovered the secret to utterly amazing perfect pizza at home.

It's in the heat. Obviously. But we solved it

My siblings and I got the pizza oven for our parents as a Christmas gift. It took months to hook up to the gas line (It seemed very simple however the plumber is full of drama.) It was the perfect gift to solve our parents quest for the "ultimate" pizza which had been an obsession all summer and fall.

There were pizza experiments where the oven was preheated for an hour before cooking. Where the stone was super preheated and then the pizza was broiled (that worked pretty good.) Variations on the gas grill.

It became a joke after pizza was tried in the BigGreenEgg (a sort of hot smoker) lots of thought was put into it by all. One was soggy and the next one looked good from the top, the bottom charred beyond what could be called food. It had become a 1/4 inch of solid carbon. Black and hard as a rock. The science behind that one still boggles us. There were lots of laughs, but a feeling that perfect pizza was out of reach. We feared it might get to the point of a big project building an outdoor oven.

Then I found this amazing machine. Pizzaria Pronto. It promised 900° and pizza cooked in 5 minutes. Did I mention it heats to the max temperature in 10 minutes. It seemed too good to be true, maybe it would be chintzy. Well its not. It is amazing. I promise I'm not working for this company, although I would be happy to, its an amazing oven.


I've made good pizza in my oven before, very good. But there is always some part not as good as the rest. Sometimes a soggy middle. An unlucky tough dried out crust. And it is impossible to get those black bubbles and well caramelized cheese which the pizza places have.

Usually I crank my oven to 500 degrees and a pizza takes about 15 minutes to cook.

This contraption cooks a pizza in 5 minutes. Perfectly. Im going to camp out next to it.

Ive even begun to fantasize about making sweet fruit dessert pizzas in there. What do you think?

This one was mushroom and onion on a thin tomato and pesto sauce with parmesan and a cheese which was between gruyere and cheddar.

You don't even have to cook the mushrooms before they go on the pizza. Ok, i'm done raving. The quest is over, we can stuff ourselves happily with pizza from the Pronto oven.

Friday, June 13, 2014

Italian spring soup

New potatoes, chives and olive oil
I am happy that springtime seems to be giving way to summer, the days of fresh fruit are ahead of us. The farmers market opened yesterday, the slow start as we try to catch up to the rest of the country's growing season. Soon there will be peaches, tomatoes, beans, its going to be good. And the outdoor concerts, beach traffic, lackluster craft fairs and hot car seats that burn the backs of your legs... summer is the best.

New potatoes chives and garlic


Spring has been so enjoyable this year, with loads of tender vegetables, shoots and flowers. And am not quite ready to let it go. So I plan to fit a few more spring themed posts into the next week. Since its not really summer yet as far as the vegetables know.


I made this soup for my book club, all who are foodies, and everyone was surprised by the broth, as it is so simple it seems different and exotic. We probably all smelled of garlic afterwards! 


New potatoes and chives steamed for 8 minutes in olive oil.

My Italian Spring Soup was inspired by Marcella Hazan's Spring Vegetable Soup in The Essentials of Classic Italian Cooking. I don't claim to know better than her, but I made some changes, like adding asparagus and green onion, which is a good touch. And making it easier with frozen artichoke hearts. I did retain the simpleness of the broth, simply water with lemon juice added as the last thing. So bright, and full of clean flavors, surprisingly different.


Soup making with colorful potatoes
Easy prep for springtime soup


New potatoes have less starch than their larger cousins and hold together well in soup. They come in many shapes and colors. I found a charming mix of tiny blue, red and yellow potatoes. The color variation makes for a beautiful dish. 


Use what you can find, the red skinned ones are pretty, but the yellow have the most creamy texture.


A word to the wise. All the veggies begin as nice bright colors, once cooked they loose some of the vibrance. If served right away, all is colorful. The longer the soup sits in the pot waiting for your friends to arrive, the greens fade and fade. It is still delicious, and will recieve ohhs and ahhhs. 

Next time I make this for a party, I will add the final vegetables in a right-beofre-we-eat sort of way. To keep the asparagus and green peas more green.


Have more lemons on hand to finish the broth, mostly 1 lemon will be enough, I made a double recipe of soup and needed two whole lemons. If you taste the soup before you add the lemon juice, and then taste it after, it will become obvious if you want more lemon juice at that point. Or not. It comes across as bright tasting, not sour.

Everything gets more green
There are some either-or's in this recipe for easy spring conversions. green garlic, and spring onions if you have it. If you have garlic scapes some of them would be right at home here too.


Spring Italian Soup
servings for 4

Garlic, 2 tablespoons minced. or 1 head green garlic, chopped fine
4 tablespoon olive oil
1 pound new potatoes, sliced 1/4 inch thick
1 spring onion, white and green parts sliced fine. Or 4 scallions, sliced.
4 cups water
rind from parmesan cheese (optional)
1 handful frozen artichoke hearts.
1 bunch asparagus, about 8 ounces, 1 inch lengths sliced on the diagonal
3/4 teaspoon salt
1/2 cup peas (thawed if using frozen)
Juice of 1/2 lemon
Good quality Parmmigiano-Reggiano grated

Slice the potatoes and place into the soup pot. Add sliced onion, minced garlic and olive oil. Put the pot over high heat, for about 40 seconds, stirring often.

When the garlic is fragrant add the sliced potatoes begin to stick, cover the pot with a lid and turn down the heat to low.

Cook covered for about 8 minutes, lift the lid a few times to stir the potatoes, they may begin to stick on the bottom, check that they don't brown.

After 8 minutes, or if the vegetables stick too much to the pan, cover with water and scrape the bottom. First bring liquid just to a boil, then turn to a low simmer. 

Add the cheese rind, asparagus, artichokes, and salt. Keep the heat low to retain the tender flavor of the spring vegetables. After about 15 minutes at a low simmer, when the potatoes are fork tender, add the peas. Take off the heat, the peas will warm through with the residual heat. Add lemon juice to taste.

Serve in soup bowls with large amounts of grated Parmmigiano-Reggiano cheese and slices of good crusty bread. 

Serve with crunchy bread and lots of grated parm


Tuesday, May 6, 2014

Roman Artichokes with Mint & Garlic


The artichoke is a most wonderful thing. Enormous edible flower buds. Just glorious! Growing up we had them as a special dinner in the spring, just steamed and served with hollandaise sauce. I always loved them. When I moved to San Fran I learned you could buy them as baby and young artichokes too.
http://static.ddmcdn.com/gif/willow/artichoke-info0.gif
My in-laws make these bold artichokes with mint, garlic, salt, pepper, and olive oil stuffed inside all the leaves. I liked them but couldn't get much of a recipe out of my mother in law, she always shrugged it off. And everybody said Grammy made them the best anyway. Sadly, I never had the chance to meet the matriarch of the family who was a legendary cook. One day this spring, doing research for some writing, I was deep in Italian cookbooks. A recipe jumped out at me, Roman Artichokes from In Nonna's Kitchen. There was the mint and garlic and I thought "I've FOUND IT!"

Soaking trimmed artichokes in lemon water.

I made them them for my husband, mostly following the recipe to test it out. His grandmother's artichokes are among his TOP-5 favorite foods. (Although the TOP-5 has more like 20 favorite foods.) So the pressure was on. Incidentally, I also used my pressure cooker, because somebody had a memory of Grammy using a pressure cooker, but nobody had recently. I thought this might be a clue.

The first batch were good. Really good. The only suggestion was "they should have more pepper."

So I forged on and made them for the family. I put in much more pepper, and sadly I don't have exact measurements because it is that sort of a thing so I have modified the recipe from In Nonna's Kitchen with my changes to the best of my ability.

I felt the ultimate satisfaction when my artichokes were approved as as good as Grammy's. And they wondered if I wasn't really Italian and hiding it. The whole table stripped the leaves in almost-silence, which is saying something!

Crispy Roman Artichokes

Roman Artichokes with Mint & Garlic

4 large artichokes
2 lemons
2 teaspoons dry mint
1 teaspoon dry marjoram
1 1/2 teaspoons garlic powder
2 garlic cloves, crushed
1 teaspoon black pepper (the powder)
1-2 teaspoon salt
1 cup olive oil
1 cup water
1/3 cup dry white wine

Fill a bowl with cool water, cut one lemon in half, squeeze it into the water and drop in the halves.
Trim the artichokes; remove the toughest outside petals, use scissors to cut the sharp points off the leaves, and a knife to chop off the top inch off of the artichoke. The stem is very tasty, cut the stem off at the base, and peel off the tough outside and the old cut end. Submerge the trimmed artichoke in the lemon water. This stops them from turning gray when cut, and it may tenderize them or impart flavor. The Nonna said to soak them for 2 hours, so I did, I have no complaints and will continue to do it this way!

Put the fresh garlic through a press, or mince small. Mix with the powdered garlic, dry mint, majoram, black pepper and salt. Pour some olive oil into the mix, making a thin paste. Remove an artichoke from the water, shaking it out, use your fingers to open up the petals a little bit. Scoop up some of the herb oil paste in your right hand and cup it on top of the artichoke, smoothing it downward so it goes in between the petals. Divide the herb paste among the artichokes. 

Place the herbed artichokes upright into a pressure cooker (or a regular soup pot.) It is ok to stack them on one another, use the peeled stems to hold them upright if necessary. Add the water, wine, and drizzle some more olive oil into their centers. Bring the pressure cooker up to pressure and cook for 10 minutes. (If using a soup pot, simmer covered for 35-40 minutes.) To test for doneness pull one of the outisde petals, if if falls off, it is done, if it hangs on it needs more cooking. Which can come on the stove or later in the oven. Remove to an ovenproof baking dish. The sauce in the bottom of the pan is precious and should be poured over the artichokes. (You can do up to this point ahead, and cover them in the fridge for a day or so until ready to crisp them.)

Preheat the oven to 400°, put the artichokes uncovered into the oven. Cook for about 30 to 40 minutes until the outsides are golden and terribly crispy, the oil will be sizzling. If you are in a rush, it is possible to broil them, and I did this once. It is nearly as good. It goes very fast, make sure to get the oil to sizzle madly, as this turns the flavors from a steamed thing into something terribly better. Cooked for the 40 minutes in the oven they nearly melt away in your mouth. 

Drizzle any sauce over the artichokes as you serve them. I find shallow bowls are best so you have somewhere to put the petals as you eat it. And you know not to eat the choke; scoop that out with a spoon. Happy springtime!