Showing posts with label vegetarian. Show all posts

Tuesday, May 5, 2015

The most delicious and clean tacos ever! Sweet Potato with Greens and Plantain Tortillas, Paleo, Vegan and Awesome


Today is Cinco de Mayo (yay!) it is also the middle of a strict springtime vegan-paleo goal for me. So what to do. I looooove Mexican foods, it will be one of my favorite cuisines ever and always. My eyes were first opened to mind blowing vegan Mexican food at Gracias Madre in SF. I was lucky to eat there many times, but it was a taco plate when I first fell in love. There were piles of cooked leafy greens, spiced sweet potatoes, and all the crunchy toppings. I think there were beans and loads of their wonderful freshly made tortillas. This today is my homage to them.  The tortilla making is easy as pie, but if you love corn tortillas-by all means use those!

Paleo Plantain Tortillas 
with
Chili Sweet Potato, Leafy Greens, and Avocado

Tortillas:
Makes about 14 tortillas (taco "corn-tortilla" sized)

  • 4 green plantains
  • 1/4 cup hot water (or more)
Leafy Greens:
  • 1 bunch collards, swiss chard, or kale
  • 2 cloves garlic
  • 1/2 cup water
  • 1 teaspoon ground cumin
  • salt
Sweet Potatoes:
  • 4 sweet potatoes
  • 1-2 teaspoon chili powder
  • 1  teaspoon garlic powder
  • 1 teaspoon cumin
  • salt
Also: 
  • Avocado
  • Cabbage
  • Raddishes
  • Cilantro
  • Salsa


For these tortillas I want a savory or neutral sort of flavor so we use the unripe or green plantains. Peeling them can be a little bit of a chore, here is a link to my earlier instructions how to do this quickly. The plantains need to be peeled and sliced into chunks before boiling for 20 minutes. You will see the raw plantain is a very pale yellow color, once it has cooked in the boiling water there's a much deeper yellow color to the flesh. 

When the plantains are fork tender drain into a colander in the sink. Wait 5 minutes so they cool a bit. Place plantains in the bowl of a standing mixer, mix on low for about 5-8 minutes. If you have the plastic guard that keeps things from jumping out the sides of the bowl now is the time to use it. If not you can hold a tea towel around the top of the bowl until pieces stop trying to jump out. 

At first it may seem very dry and crumbly, but there is a nice point when everything comes dough like. Depending on your plantains and how ripe and cooked they are this may take more time than you expect just keep the mixer on. If everything is looking very dry, which happens due to moisture escaping through the steam, add a splash of hot water until you have a consistency like cookie dough. 

With our plantain massa ready we can move onto shaping and cooking the tortillas:


You will need a tortilla press or two rigid cutting boards. Parchment paper folded in half or a plastic bag cut into two pieces.Some coconut oil or other oil of your choice. A hot griddle or frypan. 
  1. Heat the griddle.
  2. Apply a tiny bit of coconut oil to the inside spots of the full department where you will flatten the dough. 
  3. Roll a ball of the dough in your hands.
  4. Place in between the two sheets of parchment or plastic
  5. Position this parchment sandwich in between your two cutting board or tortilla press. 
  6. Press straight down, with all your bodyweight. 
  7. Remove the top cutting board and check your tortilla. 
  8. Peel off the parchment carefully, this is easier than you imagine.
  9. Move the tortilla in hand directly to the griddle.
  10. Cook on each side for about 5 minutes. They will look dry, pale, with not much color. The edges will turn out just a bit. 
Repeat until the dough is all used up! 

Cut a bunch of collards or Swiss chard into thin ribbons. Cook on the stove with two cloves of minced garlic, salt, a teaspoon of cumin, and a 1/2 cup of water. Simmer and sauté until the water has about braided and your greens are tender and bright. 

Cube your sweet potatoes into roughly half inch pieces. Toss to coat with olive oil  and 1 to 2 teaspoons of chili powder, 1 teaspoon of cumin and 1 teaspoon of garlic powder. Spread on a sheet pan in one layer. Bake roast at 350° for about 30 minutes, until they're tender. There is no need to stir the sweet potatoes while they are roasting see you can just forget about them until the timer beeps!

Clearly, tacos should be assembled right as you are going to eat them. Place a small bed of greens as a base on the tortilla, followed by sweet potatoes, then topped off with thin slices of avocado, radish, cabbage and cilantro. salsa or hot sauce is always a good idea in my book.


 Enjoy!
***The tortillas will keep for a few days in the fridge kept sealed up in a bag. Very good just microwaved for 20 seconds to warm them up again. Or even better, throw on a hot dry pan till warm.

Friday, March 20, 2015

Red Lentil and Bulgur Kufteh in Lettuce Leaves


Last night I was lucky to be at the super creative PEM/PM Artopia event doing a demonstration on my meatball cookbook. The theme matches so well with the museum's focus on global cross-clutural exchange that it was a fun fit. They let us pass out samples and make a mess but we couldn't actually "cook" with any flame. Besides that technical issue, it all was fun! I am so glad that so many people came out to see us!  

These Kufteh are a traditional and popular appetizer in many middle eastern homes. They are like a vegetarian meatball, the texture of a chunky hummus made from red lentils and cracked wheat. The lettuce leaf provides an enjoyable crunch and an edible wrapping. They are eaten chilled or at room temperature, and made a delicious lunch or afternoon snack. A sprinkle of finishing salt and lemon juice is usually squeezed over the top. Last night we added a sliver of spicy cucumber pickles as well. 

If the appetizer presentation doesn't suit you, try the kufteh on top a large salad. They are naturally vegan. to make a gluten free version try replacing the bulgur with quinoa (but it would have to be simmered along with the lentils.) 


Red Lentil and Bulgur Kufteh in Lettuce Leaves

makes 20 veggie balls

1 teaspoon cumin seeds
1/2 cup red lentils
2 cups water
1/2 cup bulgur wheat (fine)
1/2 teaspoon salt
3 tablespoons olive oil
1 medium onion, minced
1/2 teaspoon aleppo pepper

20+ little gem lettuce leaves
1 handful parsley, chopped fine
lemon juice
spicy pickles (optional)


Toast the cumin seed in a dry pan on high heat. When the cumin becomes fragrant and the seeds darken a little in color.

Combine the lentils and water in a medium saucepan, bring to a boil, skim off any foam, reduce the heat, and simmer 30 minutes. Not all of the water will be absorbed. 

Add the bulgur and salt, into the pot with the lentils. Stir together, cover and let sit for 30 minutes, until the bulgur is tender and all the liquid absorbed.

Heat 2 tablespoons of olive oil over medium heat and add the onion. Cook slowly for 10 to 15 minutes, until transparent and tender. Stir often. Add the ground cumin and stir together for about 30 seconds, then stir into the lentils and bulgur.

Using a wooden spoon or spatula, beat the lentil mixture in the bowl for a few minutes. This makes the mixture creamy. If it seems dry and crumbly, add a tablespoon of water at a time. Stir in the remaining tablespoon of olive oil, and Aleppo pepper if desired. Taste and adjust seasoning.

Using two soup spoons form the lentil mixture into quenelles, (football shapes). Or, moisten your hands and shape the mixture into small lime-size balls. Moisten your hands again whenever the mixture begins to stick. 

Place on lettuce leaves arranged on a platter. Garnish with parsley and sprinkle with lemon juice and a dash of salt. A small slice of pickle is an untraditional but delicious addition. Serve cold or at room temperature. 

You love it? Its in my book, along with a bunch of other veggie balls and more!

Saturday, February 28, 2015

Mushroom Quinoa Pilaf with Sundried Tomatoes and Pesto


I am still cooking out of the pantry and the freezer. I think this is the last bit of quinoa in my house. So far the pantry challenge is going fine. If you missed it, look at my cupboard and freezer here. 

When I make quinoa pilaf all the veggies tend to rise to the surface during cooking. This one was different than my usual, with the addition of pesto and sun-dried tomatoes. The concentrated tomatoes gave it a wildly deep complex flavor. It is full of summer sunshine. Try it in your own kitchen. Made with frozen vegetables it a matter of dumping it all together and setting it to cook. Even the mushrooms and pesto were from the freezer.

Obviously it is easy as pie. Switch up the veggies, add in carrots or kale, you really can't go wrong.

I have a bowl as a meal by itself. It would make a luscious side to grilled fish. 

Mushroom Quinoa Pilaf with Sun-dried Tomatoes and Pesto

2 cups quinoa
4 cups water
1/2 cup frozen or fresh leeks (sliced)
1/2 cup frozen green peas 
1/2 cup sun-dried tomatoes in oil
1/2 cup mushrooms cooked in olive oil (frozen or fresh)
1/4 cup basil pesto
generous pinch of salt

If using fresh mushrooms, slice and saute in olive oil with a pinch of salt. Slice the sun-dried tomatoes into bite sized pieces.  Put tomatoes and green peas, leeks, mushrooms and pesto into a pan with a tight fitting lid. 

This is a quick pilaf, the kind your whip up when you want to eat soon. The sun-dried tomato richness means we can skip a sauté step and still have complex flavors.

Add the water and quinoa to the same pot. Bring it to a boil. Give it a stir, cover, and cook for 20 minutes on low heat.

Enjoy!  

Wednesday, February 25, 2015

I embark on a Freezer & Pantry Challenge - no grocery shopping allowed!

A confluence of events has lead me to challenge myself to a Freezer & Pantry Challenge. How long can I cook meals in my kitchen without going food shopping?

Thinking of ditching my grocery shopping habit this is what I feel:

But then I thought: 


So this is the question: how creative can I be with all the things in my pantry and freezer? I also include the contents of the fridge, but that is currently pretty empty. 

Why, you wonder. For one, I am tired of all the "fresh" food I purchase going bad in days. Potatoes grow sprouts or shrivel up, lettuce melts into slime overnight. Food in Massachusetts is bleak in February. If I had all the time in the world, I would recommend shopping more often during the week. But for many people, including myself, that is not a reality. Work schedules, car sharing, snow related parking bans, all make grocery shopping less than simple. 

I normally food shop once a week. I went a week ago and decided to skip this weekend's shop in light of challenging myself. 

Two other reasons.
1) My husband rolls his eyes at the amount of food I have in the kitchen and still feel the need to go out an buy more. I like having a good selection and I have this feeling I like to be prepared, like if the zombie apocalypse ever happens. I will be able to barricade myself in my kitchen eating gourmet meals for weeks. If that happens, and you are really nice, I'll share with you.
2) Lets be honest, February was a rough month here for those of us not on salary.  All those snow days don't pay the bills.

Pictures of my pantry before I start. As I was taking these pictures I began to feel that I was really exposing something to you here. Is there such thing as a food hoarder? Do I have that problem? My large upright freezer certainly seems to. Disclaimer: I did not include a photo of my chocolate bin.


Ok, so there are loads delicious summery things in my freezer that totally should be eaten up. I deserve to take on this challenge.


To begin the Pantry Challenge, I had a nice lunch yesterday, Mushrooms, Green Peas & Black Beans. Easy as pie and it took only minutes. For one portion, sauté about 1/2 cup frozen green peas and the same amount of frozen cooked mushrooms in some olive oil. Once they are hot and sizzling add 1/2 a can of organic black beans. Add a pinch of cumin, salt and simmer until hot and steamy. 


The mushrooms give the dish a meaty element. The beans are full of fiber and protein, the peas are green and nutritious. Of course it could be made using fresh ingredients. It is just so fast and easy this way. And a good stand by for those days when you feel like "there is no food in the house." 

Because if your freezer looks like mine...there is. Stay tuned I have a busy week ahead there will be some slow cooker and pressure cooker meals comin' up!


Tuesday, January 27, 2015

Snow Day Worthy Chilaquiles, ie: "Breakfast Nachos"!

Nachos for breakfast! Corn chips, cheddar cheese, salsa, and eggs, we can not go wrong. I fell in love with chilaquiles while living in San Francisco. They are soul filling food, soft, layered with melty cheese and a warmth from the chilies which makes my whole body excited for the day ahead.

On the this epic snowy day in New England, this is just this food I want to eat. A warm hug of a bowl of breakfast without much washing up.

I like the chips when they are somewhere between crispy and soft. Like a bowl of cereal, there is a moment of perfect crunch balance to achieve, and then it keeps fading to to soggy soft demise of the corn ship. Beautiful and delicious.


For one portion:
Crack and beat two eggs into a bowl. Set aside.
Chop up some cheddar cheese (Yes, ya'll it's lactose free!)
Heat a skillet with a little bit of olive oil.
Pour in about a 1/3 cup of delicious red salsa into the pan. Wait till it is sizzling and bubbling.
Pour in the eggs, and a handful of corn chips. And the cheese.
Give it several stirs in the pan.
Add another handful of corn chips.
When the egg has cooked, the cheese will have melted.

The corn chips hopefully will be still crunchy.

(Chips soften up fast. I find TJ's organic yellow corn chips are great. Tostitos are too thin and get soggy, if thats what you have, add them at the last second.)

Tip it out onto a plate. Serve with hot refried beans if you've got em. And crema or sour cream if you want.

delicious quick and easy chilaquiles

Monday, January 5, 2015

Perfect Baked Beans in a Slow Cooker

I know a few of you who got new slow cookers over the holidays and some of you at our Christmas table who wanted a copy of this recipe. These baked beans are for you. They are super easy to throw together last thing before going to bed and in the morning you will wake wondering what the amazing smell in your apartment is.

My family has always eaten baked beans on Christmas since my mother was a young girl. The story is, one year my grandfather decreed they should have a proper filling nutritious breakfast on Christmas, grilled steaks, baked beans and broiled English muffins with butter. For half a century or so. 

Last year was the fist year I succeeded in adding vegetables to the table! Now we include vegetable laden frittatas which make everyone from the gourmands to the vegetarians satisfied. 

Making your own baked beans costs just pennies and ingredients which are probably in your pantry. And unlike prepared or canned ones you will know just what's in them, no preservatives, no mystery. Just a little planning ahead.

This recipe is for 1 pound of beans. Easily doubled if you are feeding a crowd and your cooker can handle the size. 

Soak 1 pound of navy beans. They are the little white ones that look like this. This is the actual brand I used, just toss the "ham flavor packet" into the garbage, ok!
Instead of industrial "ham flavor" we can use real ham! Bacon, ham, or maybe you are like me and have chunks of leftover fatty ham rind in the freezer from Easter. 

Cook the pork product of your choice in a small skillet on medium low heat. Dice one yellow onion and add it to the ham in the pan. Cook this on medium low for about 10 minutes, stirring occasionally. Once the onion is softened and the ham is sizzling deglaze the pan with 3 tablespoons of whiskey. It will sizzle, cook off the whiskey. Set the ham and onion aside while the beans are arranged. 

Measure the water, molasses, brown sugar, tomato paste, salt and spices into the slow cooker. Stir to combine. Drain the beans of their soaking water.  Stir in the beans. Spoon the onion and fatty ham on top of the beans, don't stir this in, it will act as a layer to help the beans not dry out during cooking. 

Turn the cooker on high, go to bed, wake up 7 hours later to glorious smells. (If you have longer like 9 or 10 hours set the cooker to low. 

Stir 1 tablespoon of apple cider vinegar into the beans, this gives it a great bite. Taste them and add more salt or sugar as you desire, but they should be pretty perfect at this point! Serve hot. 

At Christmas we serve ours from a bean pot which is rhrumored to be my great great grandmothers. It might be true. 

Baked Beans in the Slow Cooker


  • 1 lb dry navy beans. (Soaked)
  • 1 yellow onion
  • 4 strips bacon or equivelnt ham product
  • 3 Tablespoons bourbon
  • 3 cups water
  • 1/2 can of tomato paste
  • 2 teaspoons dry mustard
  • 1/4 cup molasses
  • 1 teaspoon smoked paprika
  • 2-3 teaspoons salt

  • 1 tablespoon apple cider vinegar


(If you want to make these vegetarian, replace the bacon with coconut oil.)

Tuesday, December 9, 2014

Horchata Cachaca Cocktail, it is not Eggnog, but tastes like a holiday!


All good ideas come from somewhere, I found this one at La Brasa in Somerville. They feature a small but mind bogglingly global menu with local sources.

Our table was throughly impressed. A dinner full of punchy unexpected flavors and a really laid back vibe from the whole place.  

(clockwise: pickled beet eggs, lamb shepherds pie, flan, coconut tapioca pudding with spiced pears, awesome soup spoons.)
The element that stuck with me was the horchata. Spiked with rum (honestly I don't know what kind) it became a joyful creamy, cinnamon laced experience. Something like a Mexican white Russian or Eggnog. However, much thinner than eggnog, as horchata is made from almond or rice milk, and dairy free! It sparked a discussion with my friend about coquito, a Puerto Rican coconut holiday drink, which I am going to mix up and bring to her later this week. (Stay tuned for coquito.)


Here is La Brasa's dreamy horchata over crushed ice.


What is HORCHATA, you ask? A milky drink made from rice (or almonds or chufa) soaked with cinnamon. Sugar is added and sometimes other spices or vanilla. It is special, simple and refreshing.


So I had this new discovery, horchata with rum. Here I was, going along, thinking virgin horchata was perfect. So I had to try it again. However, not in the mood to make horchata or even crush ice,
here is my lazy version.
I totally just bought an horchata from my local taqueria and brought it home. Shout out to La Victoria Taqueria, you rock. (Finally a good taqueria around here. You make me so very very very happy.) When I go in there to get food I always order an horchata because it is awesome, it is delicious, creamy, sweet, goes with spicy food, makes me smile, and think of California. And when I ask for the horchata, the same girl always looks me in the eye and smiles like "Oh, yeah, good ordering, you know whats up!" I love that feeling. If I was her, I would sip on horchatas all day long.

But this is an horchata for after work, hear that everybody? So bring home your takeout horchata, try not to drink much on the way, this is the hardest part of it all.

Toss in a jigger of Cachaca and some optional ice. Done!

Cachaca is a white spirit, like rum, that is made in Brazil from sugarcane juice. It was a great flavor pairing with the cinnamon and creamy elements.  Instead of cachaca you could use white or light rum.

This is obviously not a precise science, it will likley taste superb no matter what you do. I swear you will not regret it. You will only regret when the horchata is empty and that you didn't buy a second one.

Maybe one day I will make horchata from scratch and then I will link to this post. For now, save yourself time and find your closest most awesome taqueria.


Thursday, December 4, 2014

Tostones & Mojo Sauce. Best Snack Ever. Paleo peeps and fried food lovers unite.

Tostones, like most fried food are best eaten hot right away. If you don't know them already, meet tostones, twice fried green plantains, with mojo (pronounced mo-ho) a salty citrus and garlic dipping sauce.

I learned to make tostones about 10 years ago from an amazing woman. This is the way her mother from Puerto Rico made them. No need to go purchase a special press or any contraptions. All you need is hard green plantains, oil, and salt. A few other things for the mojo sauce.  You will see from the pictures, we use the peels of the plantain to press the tostones flat. I know there is no better way than this. The natural cracks and inconsistencies in the peel when it is flattened create ridges in the finished chips that add to the crispy possibilities of the snack. It is the best.

Green plantains are more like a potato than a fruit. Starchy, and terribly hard, they need to be cooked to become edible. The first fry softens the plantain. Then it can be pressed. The second fry completes the cooking, and creates the delectable crispiness we are after. The thicker areas of the chips puff and the meaty plantain is one with the golden brown crackled edges.  I find peanut oil gives the best fry, but any neutral flavored vegetable oil will work.

If you are new to plantains, the only trick is in the third photo. Slice through the peel but not the fruit on opposing sides. Use your knife as leverage in the cut to lift up the peel as much as you can. Put down the knife and finish the job with your thumb, running it under the peel, until it pops off. Simple. (If you are doing a lot of plantains, wear gloves or coat your hands with oil, as something in the peel can stain skin temporarily. When I do one or two plantains I don't bother with gloves, soap and water work fine.)

Put on some good tunes and you will soon find an assembly line rhythm. If you are making tostones for a crowd, change to new peels after the first ones become worn down.


Tostones, Fried Green Plantains with Mojo Sauce
  • 1 cup of oil (more or less)
  • Green plantains, about 1 per person
  • salt
  • 2 cloves garlic (garlic powder is not as good, only useful in mojo emergencies!)
  • salt
  • Juice of 1 orange (or lemon in a pinch)
  • Juice of 1 lime (or lemon in a pinch)
  • 1/4 cup olive oil
  • cilantro if you have it (I didn't today)
Peel plantains. Save the peels to the side. Cut into 1/2" slices on the diagonal. Heat 1/2 inch of oil until shimmering hot in a heavy bottomed pan. Test a piece to check it sizzles immediately upon contact. Fry plantain slices until lightly golden, the color will change, but don't look for brown yet. Remove to paper towels. 

Lay a plantain peel, inside up on the counter. Place a fried slice on it. Use the other peel (inside down) to cover the slice. Press down with the palm of your hand smashing the fried plantain inside. Gently lift off the top peel. It should not stick. Use a spoon to lift it from the lower peel. Repeat, working in batches. Return flattened plantains to the frying oil. Fry until golden brown on the edges. Remove to drain. Sprinkle with salt. 

Make the mojo sauce in a bowl. Mash garlic cloves in whichever way suits you. Add the salt, juices, olive oil, and cilantro if you have it. Whisk, taste, add more salt or juice to your taste.

Serve them together, dipping the tostones into the sauce as you eat them. The acidic citrus and garlic wake up all the flavors like your mouth is dancing. 

Enjoy!


Monday, November 3, 2014

Warming Sweet Potato, Cabbage and Black Bean Vegan Casserole


Aren't sweet potatoes the most pleasing things? Comforting, soft, warm, bland but not tasteless. And they come in different colors, I got orange ones and white ones with purple skins for this recipe. They look stunning in alternating rows. This recipe takes just a bit of roasting, and is so pretty presented on the table. I made a southwestern inspired casserole here, some chipotle, some wine, some beans. All the good stuff. 


Savoy cabbage waits next to a bowl of sliced sweet potatoes tossed in olive oil, salt, pepper, sage and mexican oregano. This way they are nicely coated with oil to brown up in the roasting of the casserole process.


One head of savoy cabbage is sliced up into roughly 1/2" - 1" wide pieces. Rustic is ok! White wine, olive oil, and a sprinkling of chipotle powder are added into the pan for flavor. Lets begin the roasting, 350°.


Look, after 15 minutes or so in my convection oven the cabbage is won over. Wilted into silky strips, with charred tips which say lots of flavor.


The sweet smokey cabbage is placed in the bottom of my most beloved baking pan. (Anthropologie makes the craziest dish-ware, I love it!)
What is a casserole anyway? Instead of describing the food, its comes from the French word for the pan itself, used in both the oven and serving of the food. Casserole meaning both the very cool cookware one receives as awesome wedding gifts, and of the vegetables layered inside of it. Clearly casseroles have an image problem in popular culture, but I have no problem with them. I think anything baked together is probably better than baked alone!


Spoon a layer of black bean on top of the cabbage. Next time I make this casserole I will experiment in putting the beans at the bottom and cabbage on top of them. I feel it would make the beans more succulent. You could try it either way. So, about beans, I made mine using a dried heirloom variety, soaking and then cooking in my pressure cooker for 20 minutes. You can use black beans or pinto beans out of a can, that is easy. Remember to rinse them.


Sprinkle some chipotle on top of the beans if you are in the mood. Next comes the very fun part. Craft time with food! Arrange the slices of sweet potato in scolloped rows, alternating by color.


Bake entire cassarole in a 350° oven for 30 - 45 minutes. Crisped sweet potatoes and warmed through.

The potatoes retain their color difference after roasting, although I lack a really good photo because the evening lighting in my house is lacking and it didn't look pretty the next day. We had devoured it and it was a mangled mess of leftovers. We will make do with this one until I make this again!  Or you make it and send me the photo perhaps?

It was really impressive looking. Dinner party or pot luck worthy. Even Thanksgiving perhaps? We ate it along with salad and mustard on top. It served about 6  portions that way. Next time Ill take better measurements in the kitchen, but honestly it was really good, just wing-it, you can't go wrong.

Warming Sweet Potato, Cabbage and Black Bean Vegan Casserole


4-6 sweet potatoes
1 savoy cabbage
1 1/2 cups cooked pinto or black beans
1 teaspoon dry sage
1 teaspoon Mexican oregano
olive oil
salt pepper
1/3 cup white wine
1 teaspoons chipotle powder


Thursday, October 23, 2014

Indian Food Feast and Celebrating Diwali: Part 1


Happy Diwali to everyone, the Indian festival of lights. Celebrating the triumph of light over darkness, happiness and goodness over sadness and all the badness. The holiday serves as a moment to bring luck and prosperity to the year ahead. Diwali is celebrated all over India, making it unique among Indian holidays, which vary much from region to region. Everyone regardless of religion can happily celebrate these ideas, lightness winning out over darkness.

Candles are lit in every dark corner, illuminating both city and country in what is called the brightest of all festivals. There are fireworks and firecrackers, and lots of sweets to share. Diwali continues for the next few days, it officially begins today on October 23rd. So light all your candles and make a good wish against the darkness and the storms. 

I had a chance to celebrate Diwali, one evening early, with my culinary book-club. We had collectively read from two books by chef Vikram Vij, Vij's: Elegant and Inspired Indian Cuisine, and the more laid back  Vij's at Home: Relax, Honey.  A wide variety of recipes, with sweet stories about which ones his daughter loves, and which are favorites at the restaurant. Everything we cooked from the book was delicious, however we did find that some of the recipes could have been made more efficient for home cooks. It was agreed among all that although the recipes look long, once you get started it is very simple, as most of the ingredients are spices!

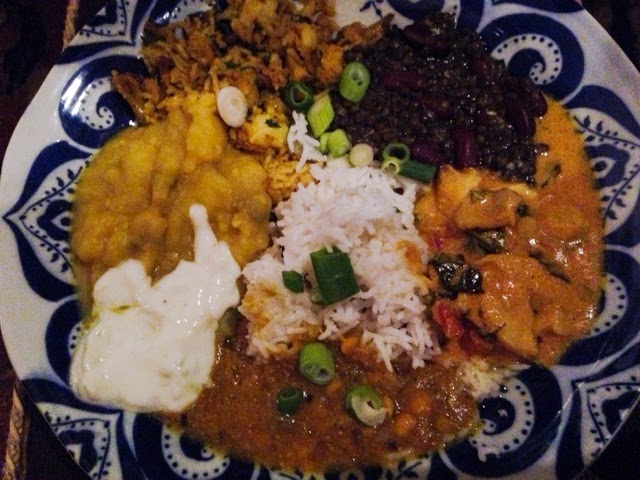
His food is clearly Northern Indian, with earthy spiced curries, and rice pilafs. Our pot-luck event netted Punjabi lentil curry, aka Daal Makhani, black lentils with kidney beans. Cauliflower rice pilaf. Potato and mushroom buttermilk curry. Brocolli rabe, tomato and mushroom yogurt curry. Chili spiced toor daal. Basmati rice and cucumber raita. Look at the variety of colors, we had full plates!

Considering the holiday, I wish I still had my copy of Great Indian Feasts, by Mridula Baljekar. She lays out favorite dishes for at least 6 holidays, Diwali being one. With fantastic stories of the dishes, how they are prepared, served and enjoyed. As well as what each one symbolizes or celebrates, a book full of riches. 

So what to make for Diwali?! Ill include the Daal Makhani recipe here, realizing with all my adaptations it is a nearly different recipe! And be on the lookout for Diwali Part 2, with a sweet recipe! As the sweets are really what Diwali is known for.


Daal Makhani, Black Lentils with Kidney Beans

11/2 cups whole urad lentils
1/2 teaspoon asafoetida (or garlic powder)
2 teaspoons salt
1 teaspoon turmeric
6 cups water
2 cans 14 oz kidney beans, drained and rinsed
1/3 cup melted ghee (or butter)
2 medium sized yellow onions
5 cloves garlic
1-2 tablespoon finely chopped ginger
1 teaspoon finely chopped chili pepper
1 teaspoon garam masala 


The lentils do not need to be soaked, however they cook in nearly twice as fast if they are soaked. Put lentils into an 4 quart pot. Add 6 cups of water, salt, turmeric, asafoetida (or garlic powder) and bring to a boil over high heat. 
Once boiling, reduce the heat to low and cover. Simmer for 30 minutes (or 15-20 if lentils were soaked.) The lentils will hold their shape, they are done when tender, they smush gently when pressed. 

While the lentils cook, make up the onion. They onion must be cut very small to hide in the daal, this is best done by grating the onion or using a food processor. Cut the onions into 4 wedges. Remove the skin and bottom. Place onion into food processor, blitz until it is all ground up, yes it will look soupy. Melt the ghee in a medium sized frying pan. Add the ground onion the the ghee. Cook on medium heat for 10 minutes, they onion will become translucent and fragrant. Chop the garlic, ginger and chili into equally small pieces, this can also be done in the food processor. Add the minced garlic, ginger, garam masala, and however much chili you want into the cooking onion. Stir, frying the onion for 5 minutes more. Some brown areas would be ok, mine remained pale.

Add the drained kidney beans to the lentils. Add the fried onion garlic mixture as well. Stir to include them, and simmer for 10 minutes so the flavors meld. The lentils hold up and can be simmered to keep it warm for an hour easily. 

Some people like to finish the daal with a good dose of cream. I personally dont, it is just beautiful as it is. 

Leftovers can be kept in the fridge for a week. Reheat and serve with everything. I even ate some for breakfast today!

Thursday, October 16, 2014

Parsnip, Mushroom and Sage Soup, vegetarian and dairy-free


Parsnips, mushroom, celery, onion and sage. I never have a recipe for vegetable soup, it always comes together magically, a little of this and a little of that. I share this parsnip soup more for the idea then the exactness of anything. There is no great story here, just some chilly evenings and this one reminded me how much I love eating soup. I find it satisfying, and comforting. Soup is a good meal for when you are eating alone, with our schedules that is most meals of the week. It uses hardly any dishes that need to be washed, there are lots of leftovers!  


I decided to puree this soup from the get go. So, it does not matter what the veggies look like when you chop them. Except, this is an important thought, celery. Celery doesn't puree up very well, the stringy parts always stay stringy. So if you cut the celery thin to begin with, the strings disappear!

Put all the veggies into the soup pan with olive oil. Heat, until everybody is sizzling nice and hot. Then pour in a good dose of white wine. Give this time to cook off, leaving just the flavor behind. 
Add water to cover the veggies by an inch or so. You can always add more. Simmer your soup for about 30 minutes, it will be ready when the parsnips (the hardest vegetable in there) are soft and can be shushed with the back of a spoon.

This is a job for an immersion blender if you are ok with a "country style" puree, meaning with some variety of texture still there. For a super smooth soup, send batches of it through a traditional blender for the best texture. If you are trying to impress somebody, you can send it through a strainer, a la French. 

Serve hot in soup bowls, with something crunchy on top. I like to toast pepitas in a small frying pan with a tiny bit of oil and salt. They sizzle like crazy when spooned onto the soup, and make a nice crunch. 
  • Parsnip Vegetable Soup

  • 1 head celery
  • 2 pounds parsnips 
  • 1 red onion
  • 8 oz sliced brown mushrooms
  • 5 leaves of sage (or 2 teaspoons powdered)
  • salt and pepper
Make soup, as directed above. Puree before serving. Keeps for 1 week in the fridge.